Paid Plan
Hundreds to thousands of documents can be created at once based on PDF files uploaded to CloudSign, and the documents that are created can then be sent as a bulk.
This function can be used in cases such as when the same format of application form is used with individual changes made to content, before sending to 100 people.
Precautions
-
The bulk sending function cannot currently be used with the Sharing function or the Add message function to the document sending email.
Contents
When you use the bulk sending, you must first create a “bulk sending template.” Then, you download the “CSV template”, enter in the necessary information, and upload it to complete the bulk sending. Further details are provided below.
1. Go to “Send new documents” and click “Prepare documents for bulk sending.”

2. Click “Create new bulk sending template”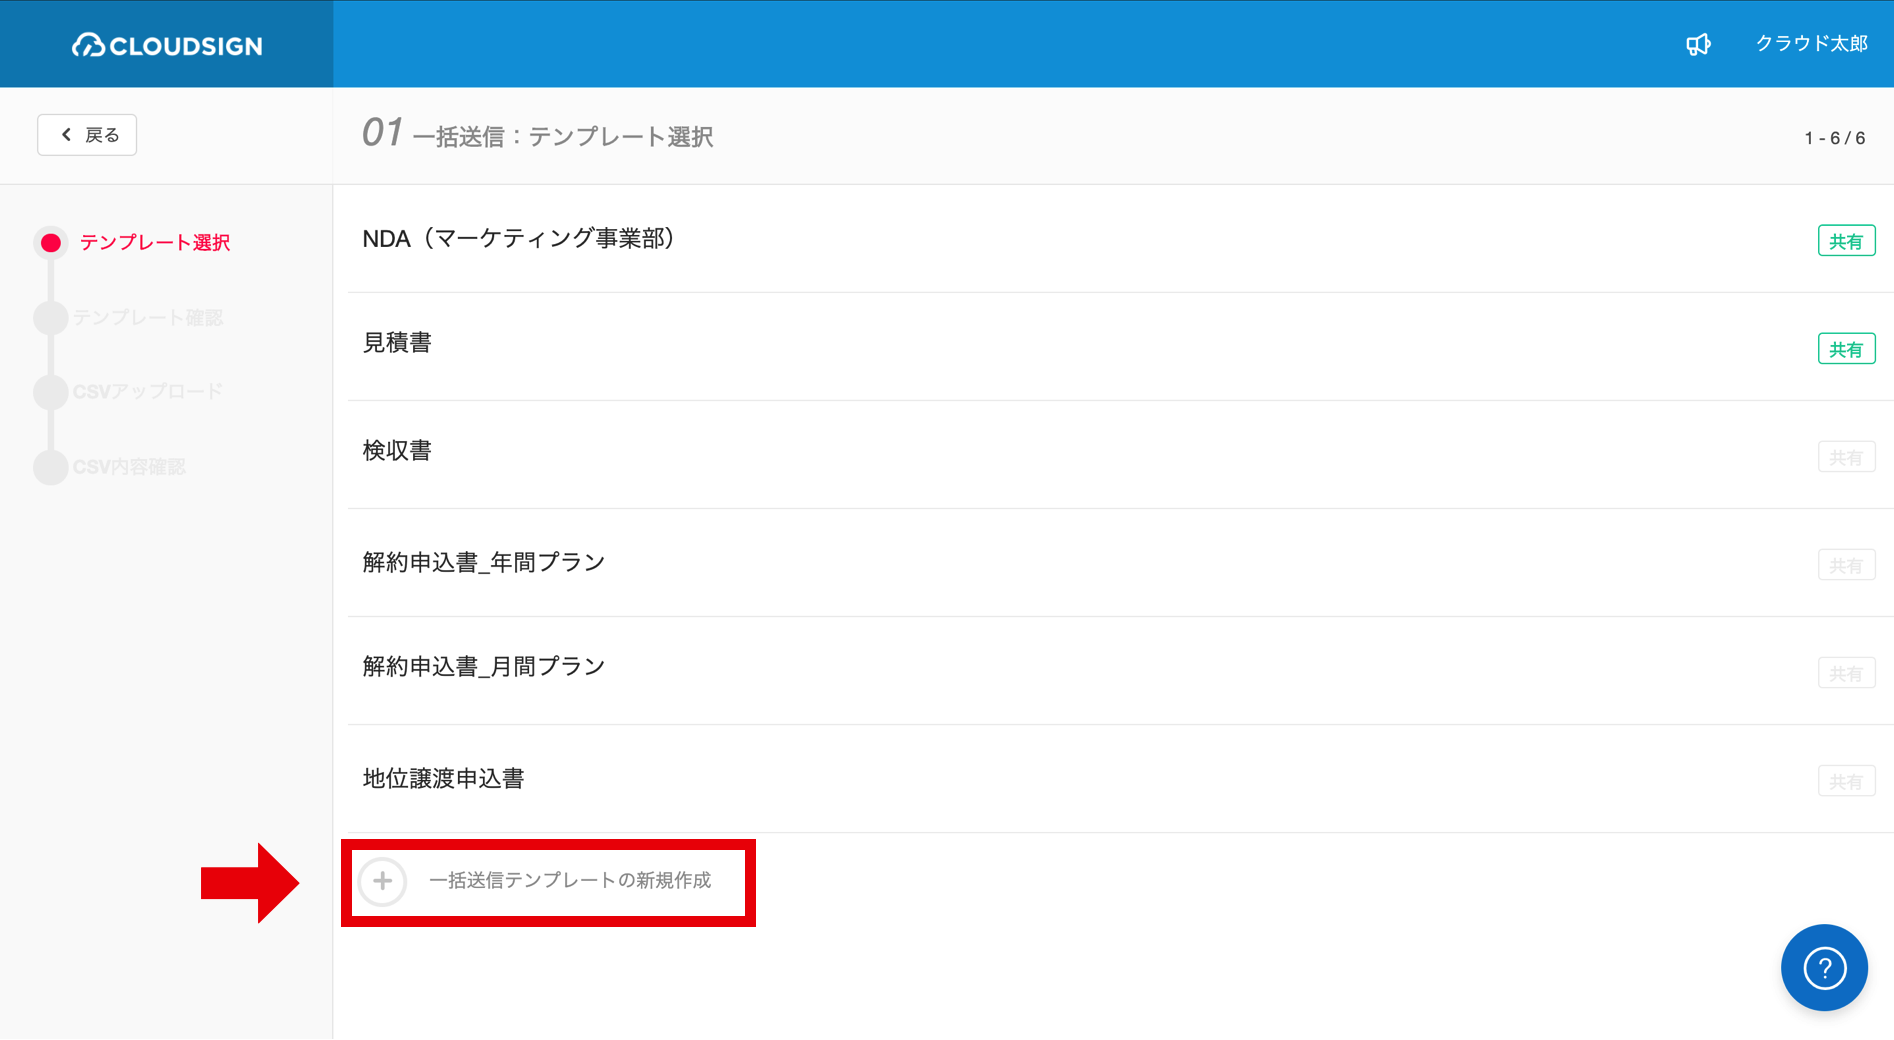
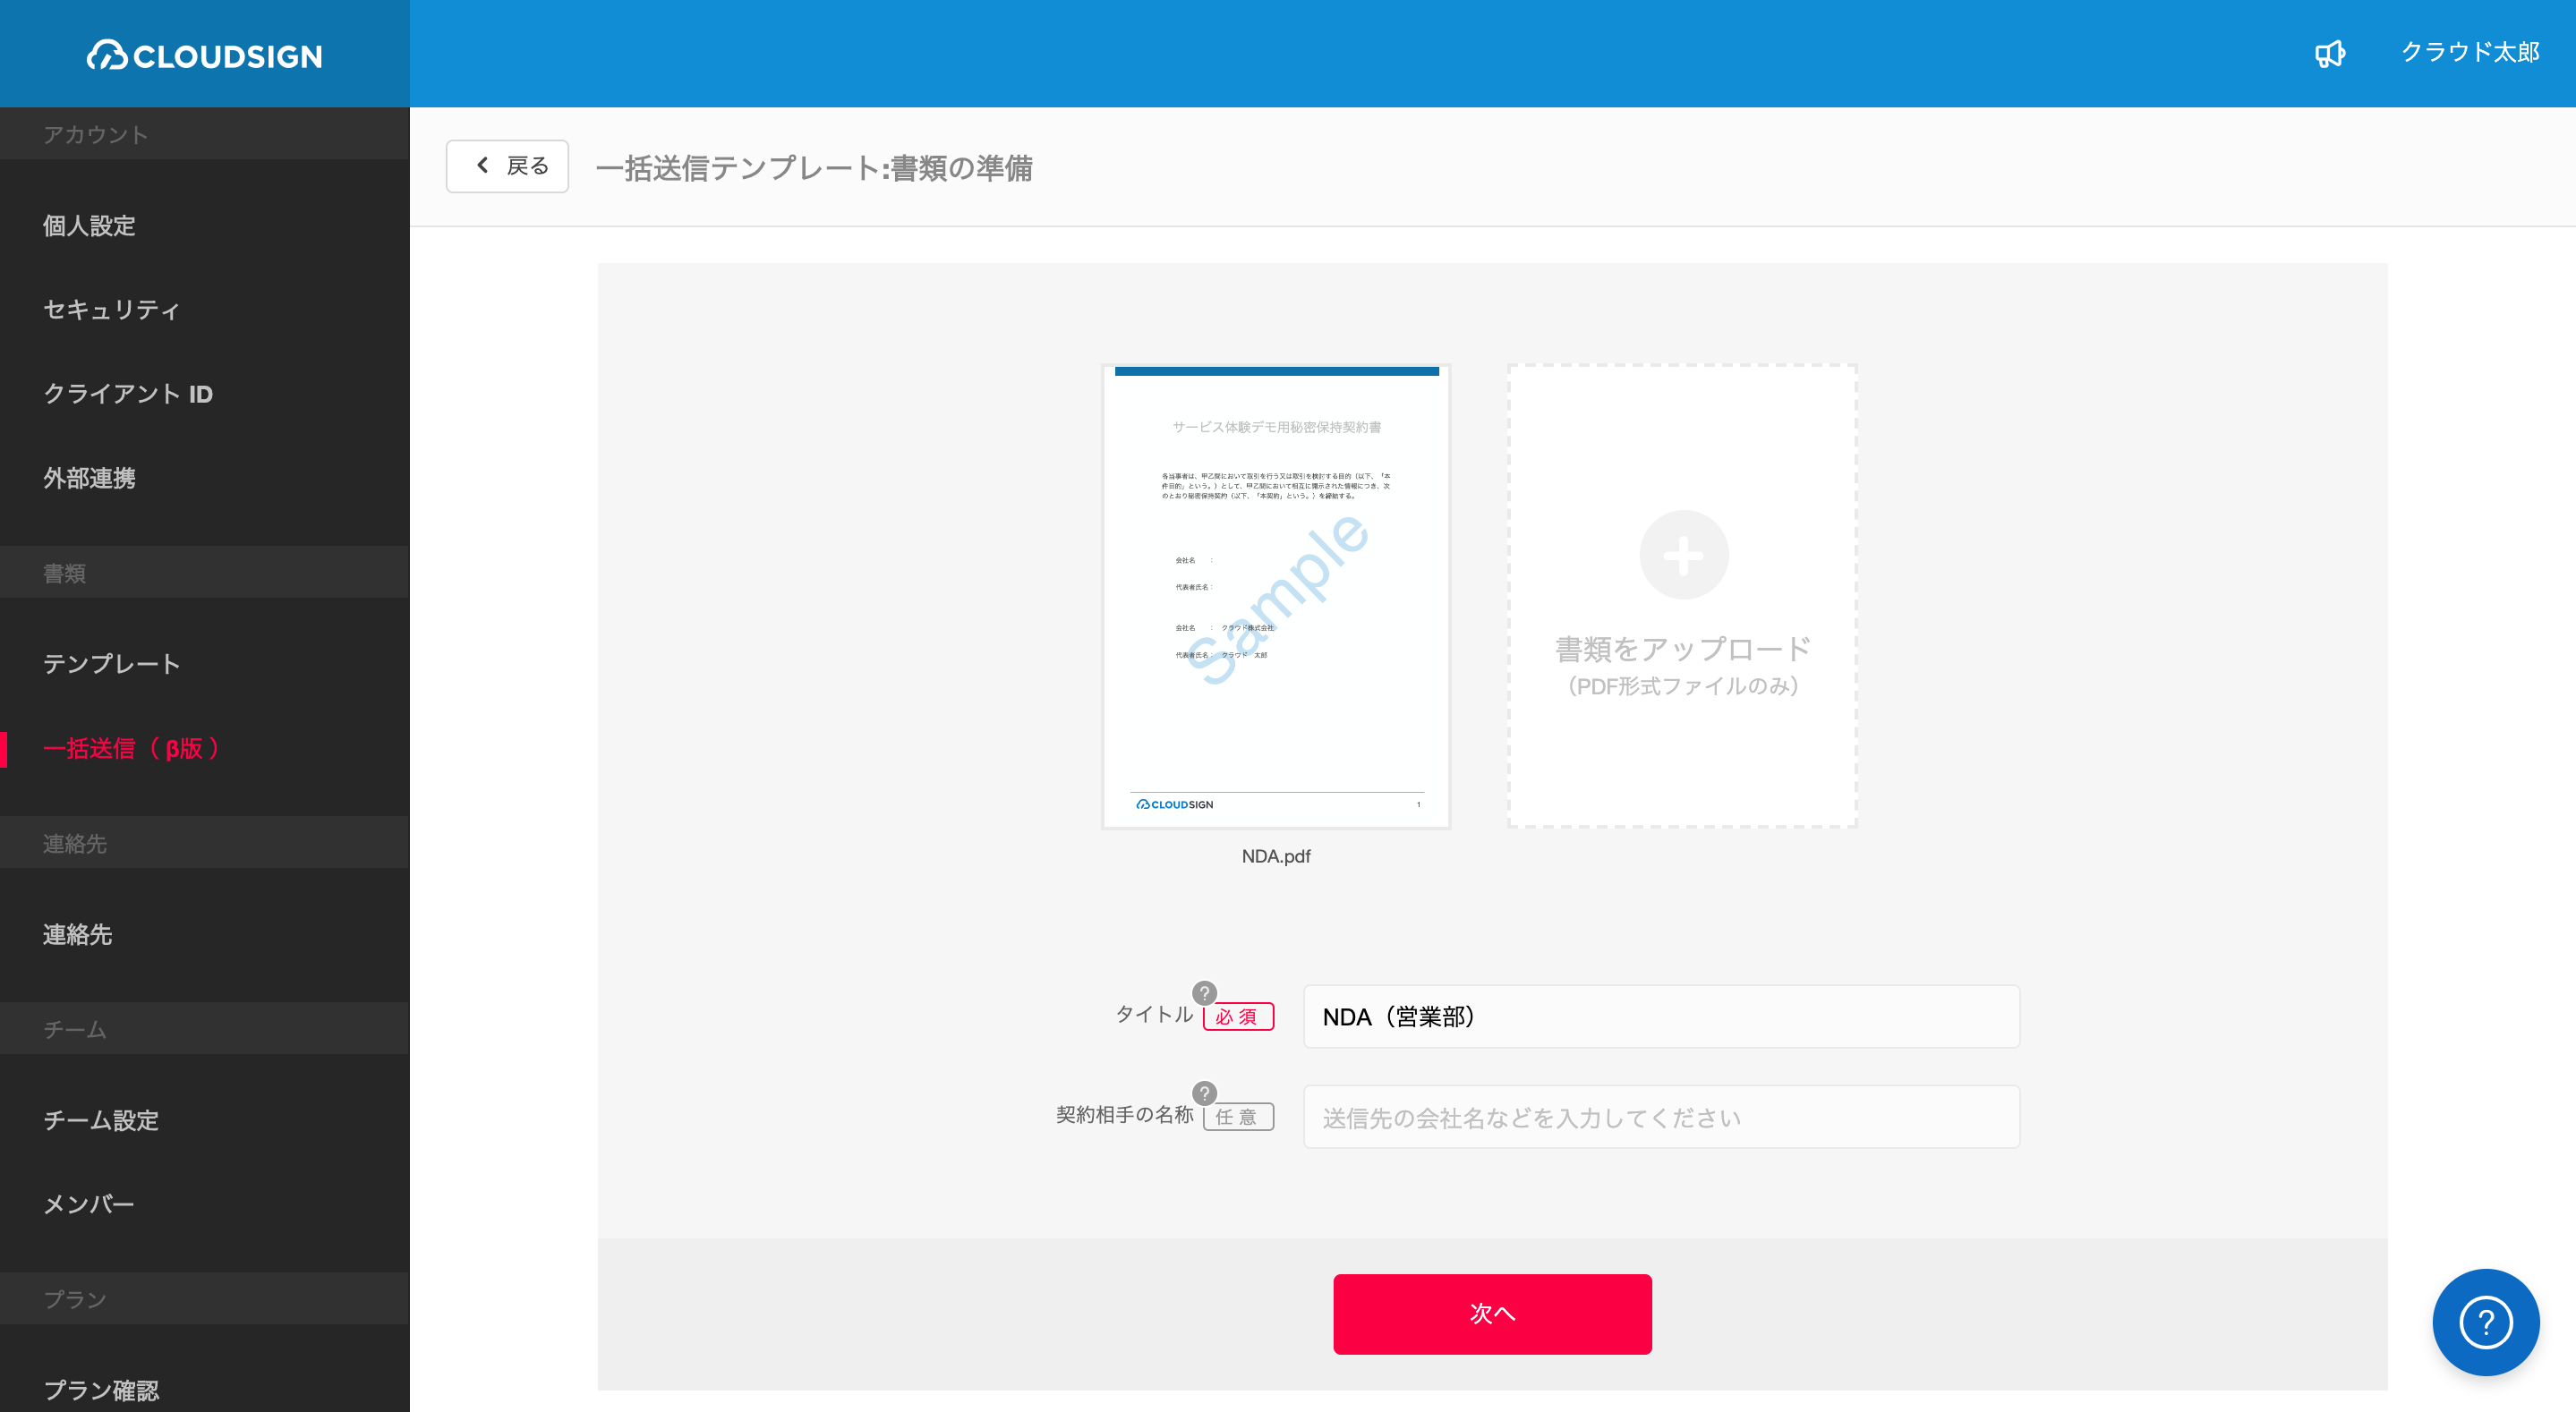
3.Upload the PDF file that the documents will be created from.
Enter an optional title and recipient names, and click “Next.”
4.Click “Add recipient” and specify the recipient as “Recipient_1.”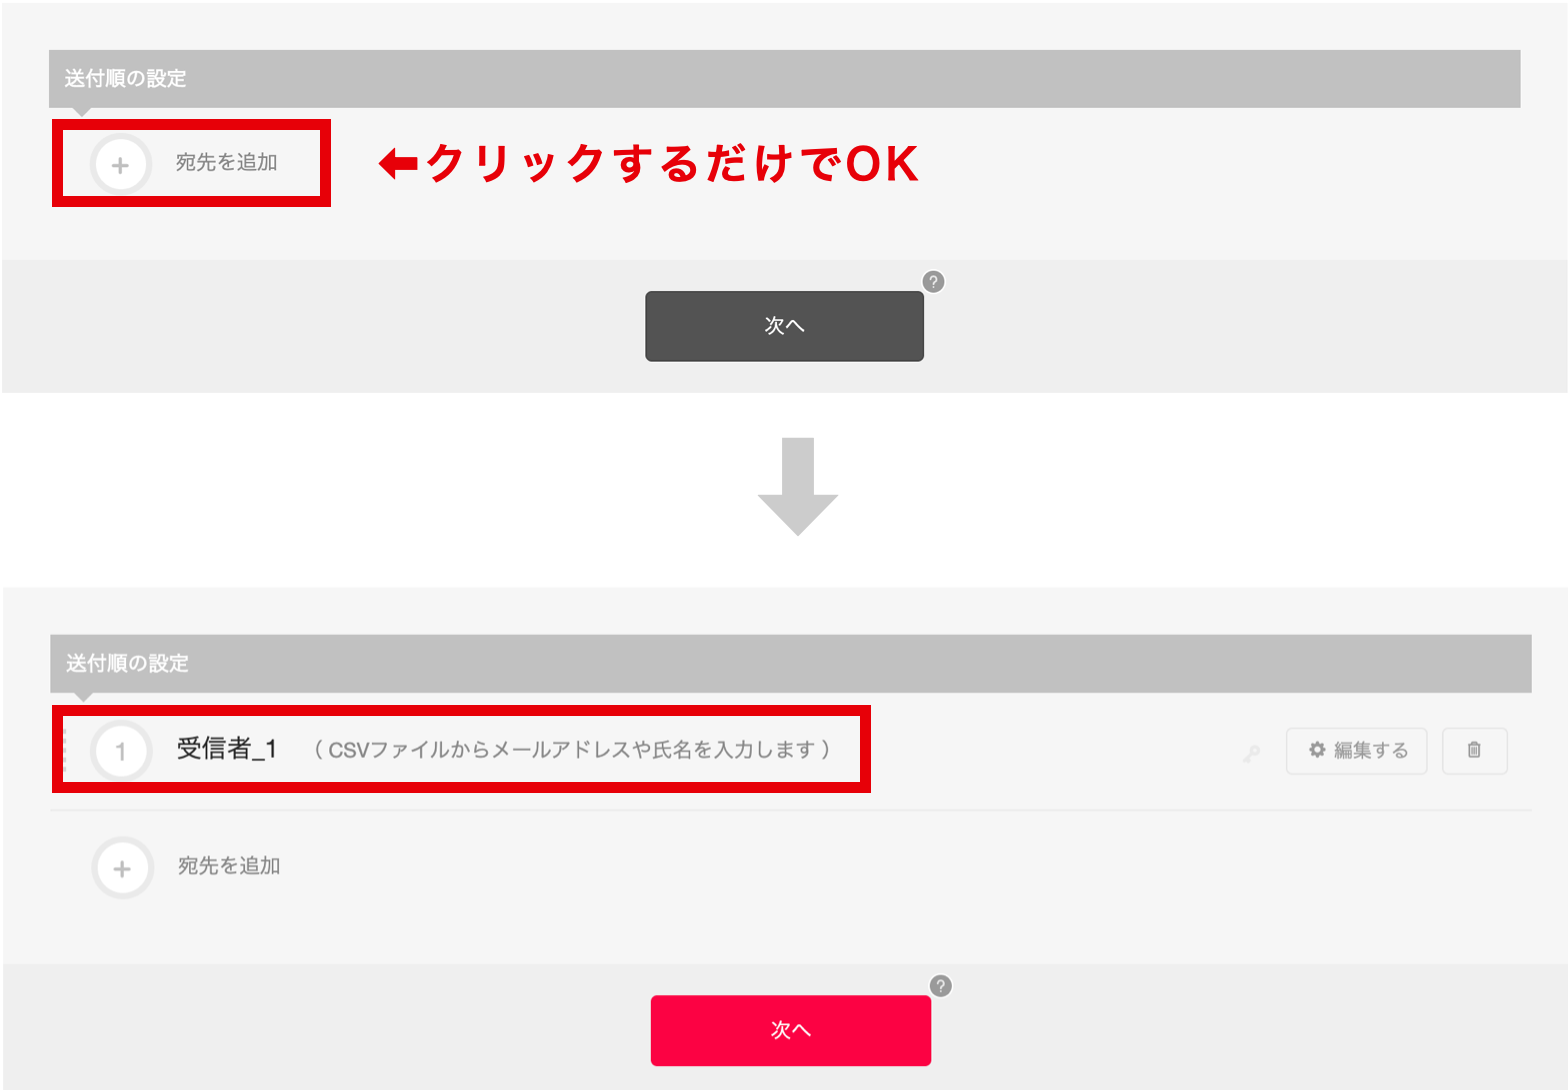
-
Do not enter the actual email addresses that you will send documents to here. Doing so will prevent you from proceeding to the next step, as details of actual recipients will be entered from the CSV file.
[Tips of setting recipients]
-
Multiple recipients can be selected
When you click the “+” button, you can set as many recipients as needed such as “Recipient_1” “Recipient_2” and so on.
By setting multiple recipients, you can create a workflow that sends confirmation request emails in order of the number assigned to each recipient.
5.Assign input fields where you want the recipients to enter and click “Finish editing.”
The method for setting input fields differs depending on the type of input field.
[Specifying “text fields” or “stamps”]
-
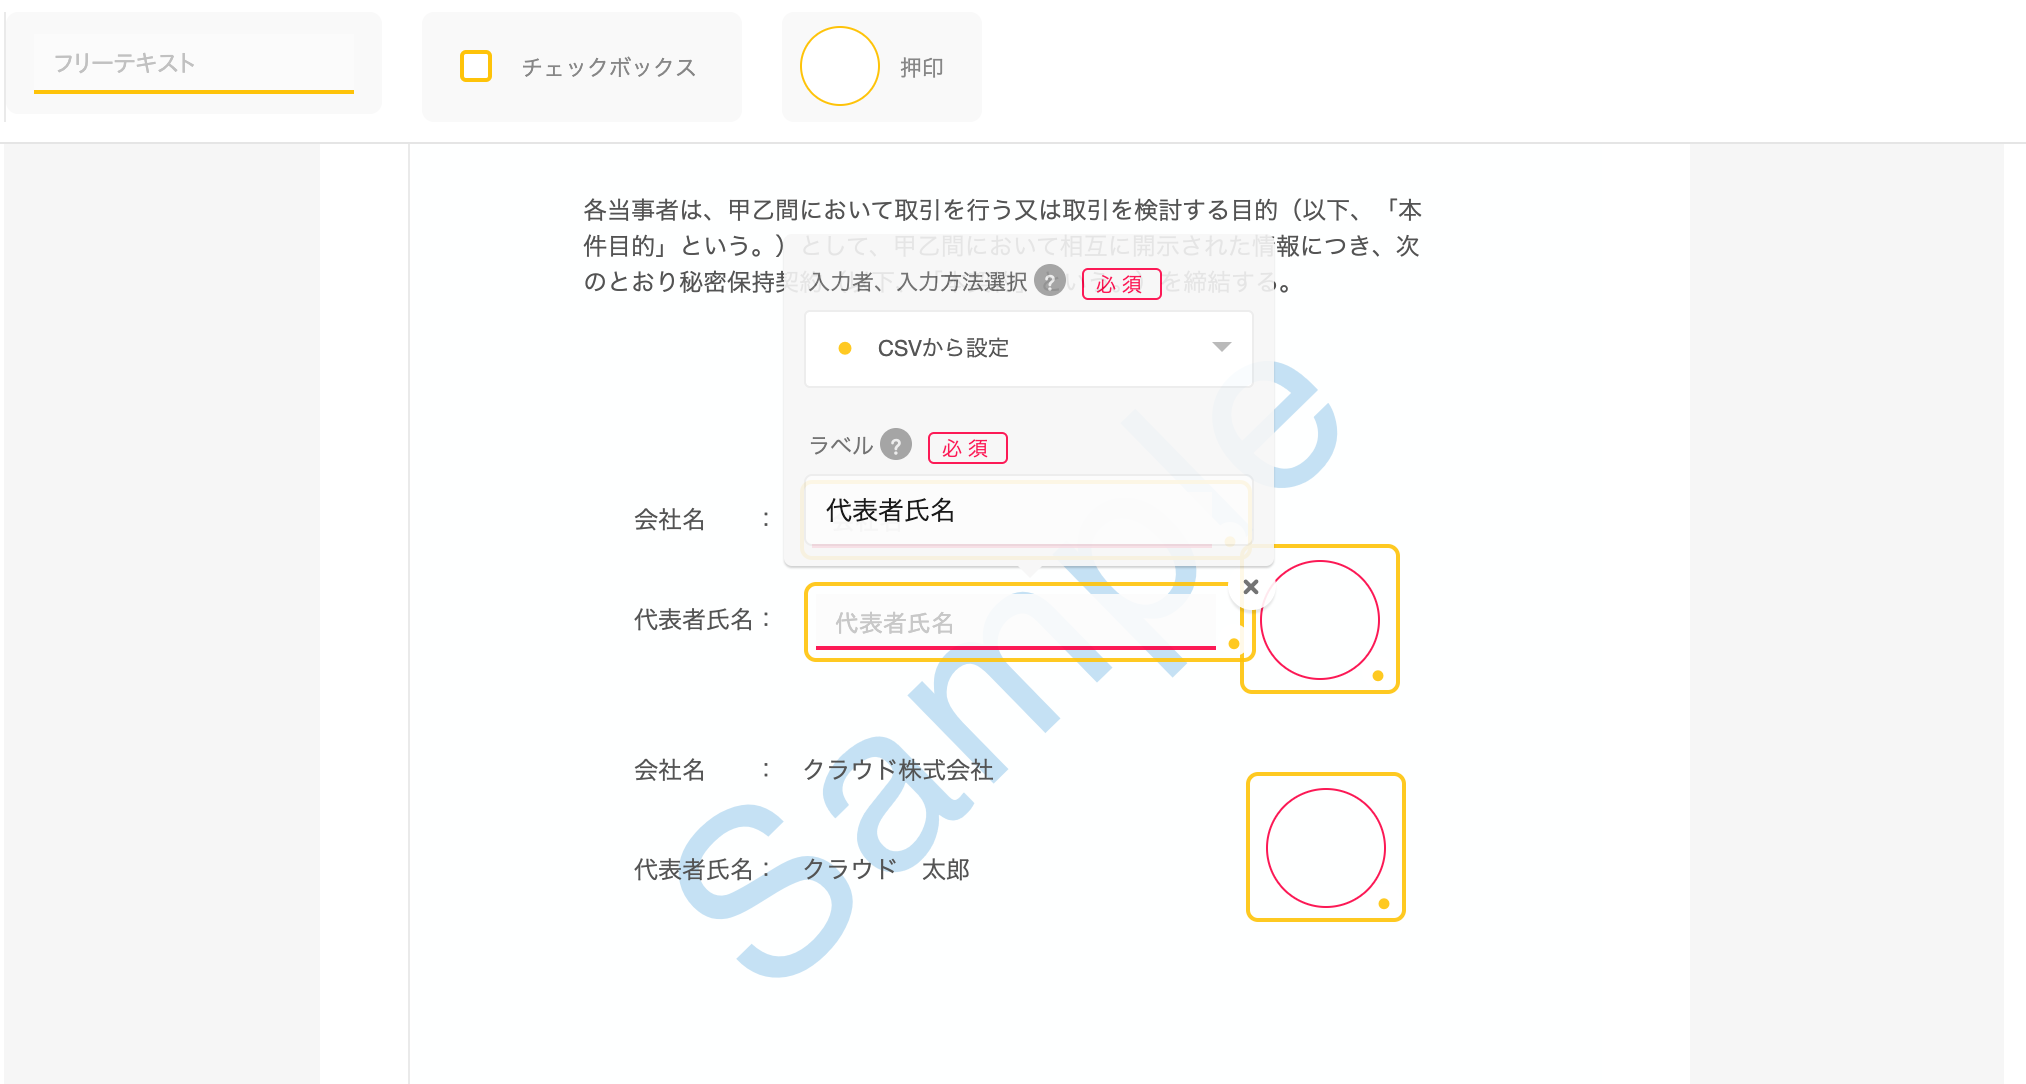
If the sender (you) want to enter the input field: Select “Set from CSV”
→ If the sender is entering different text for each recipient such as “name” and “address,” select “Set from CSV file” and specify an appropriate wording to display in the “Label.” Labels are displayed in the CSV template that is created later.
-
If you want the recipient (business partner/ other party) to enter the input field: Select “Recipient_◯”
→ To have the recipient enter their own details, select “Recipient_◯” and enter a sample in the label.
-
With bulk sendings, including
Recipient_1in the label will generate an error so you cannot use it.
[Specifying “checkboxes”]
-
If the sender (you) want to enter the input field: Select “Sender”
→Select “Sender” if you want to send all documents with the checkboxes selected. (You will not use the CSV file to input )
-
If you want the recipient (business partner/ other party) to enter the input field: Select “Recipient_◯”
→ To have the recipient select checkboxes, select “Recipient_◯” to assign the appropriate recipient. In the same window, select whether checkboxes are selected by default, and whether checkboxes are optional or required.


6. This completes the preparation of creating the “bulk sending template.”
1. Click the “bulk sending template” that you want to use from one of the following screens:
-
Dashboard > “Send new dashboard” > “Prepare documents for bulk sending
-
“Bulk sending (β version)” > “Templates” in “Mange Settings Screen”
2. Click “Download CVS template.”
3. Open the downloaded CSV template, enter the information → save.
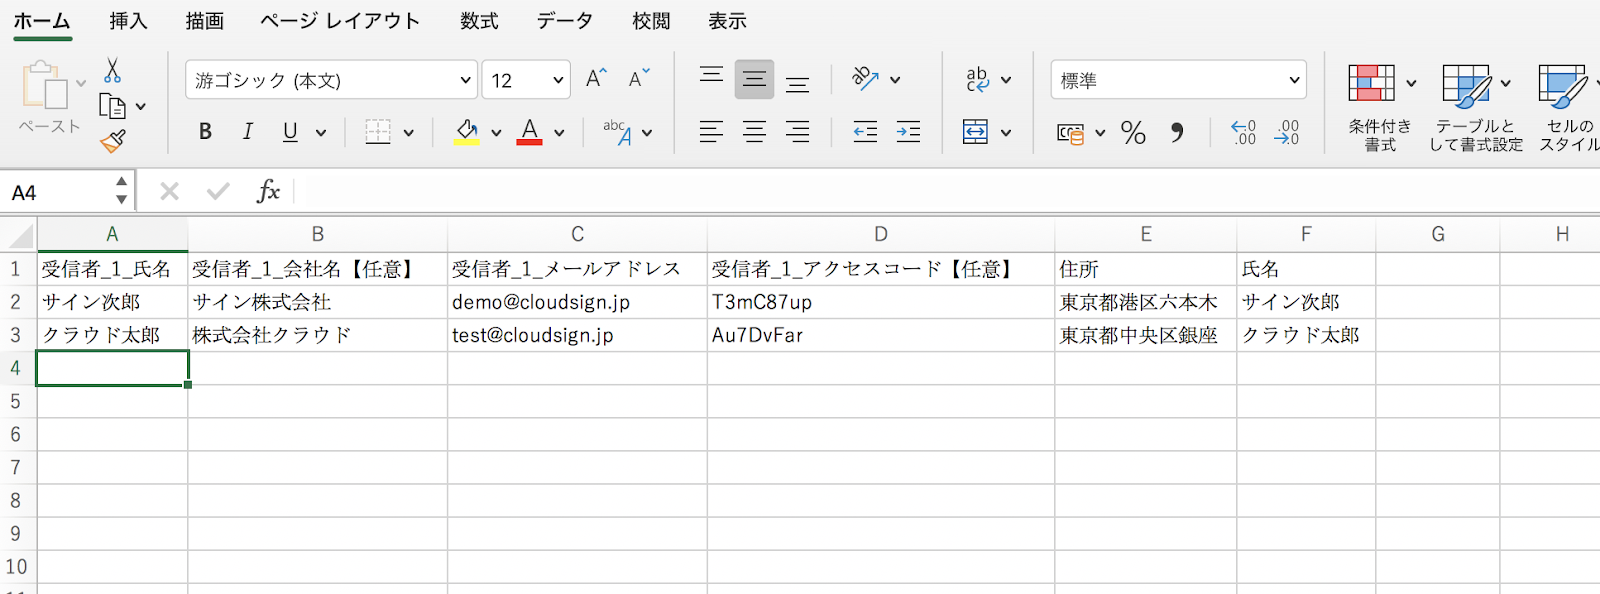
[Tips of CSV Template]
-
You do not need to fill the “optional” items. You can send with these items left blank.
-
You can change the order of the columns
-
Only single-byte characters can be used for access codes and the maximum is 64 characters. Double-byte characters cannot be used.
[CSV File character encoding types]
The following three character encoding types can be used for CSV files uploaded for bulk sendings. Please be aware that special characters not included in these character encoding types can cause character corruption.
-
shift-JIS
-
UTF-8 (without BOM)
-
UTF-8 (with BOM)
4. This completes creating a “CSV template.”
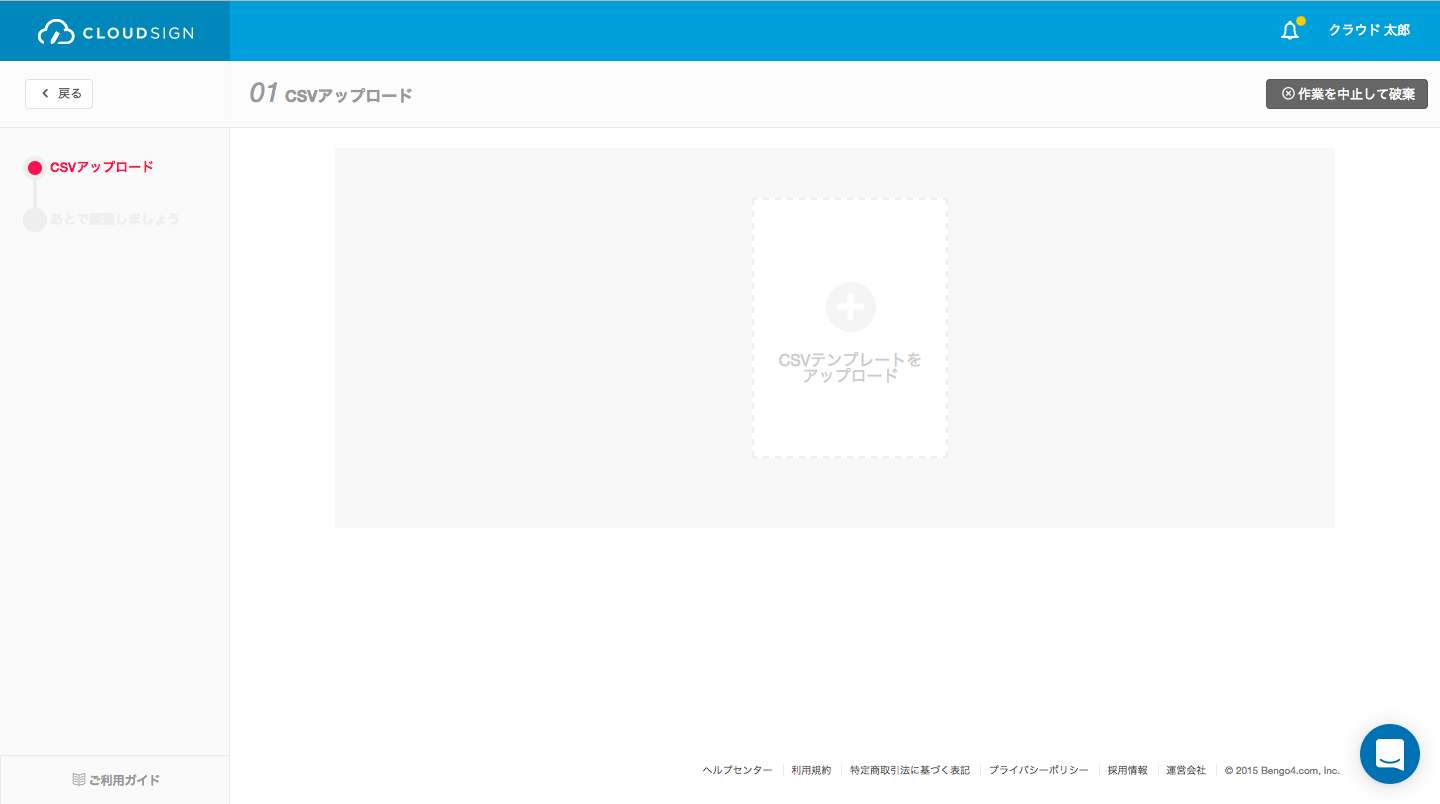
1. Select the “bulk sending template” you would like to use” and click “Use the bulk sending template” from one of the following screens.
-
Dashboard “Send new document” > “Prepare documents for bulk sending (β version)
-
“Bulk sending (β version)” > “Templates” in “Manage Settings Screen”
2. Click “Upload CSV template,” and select →and upload the “CSV template” created above.
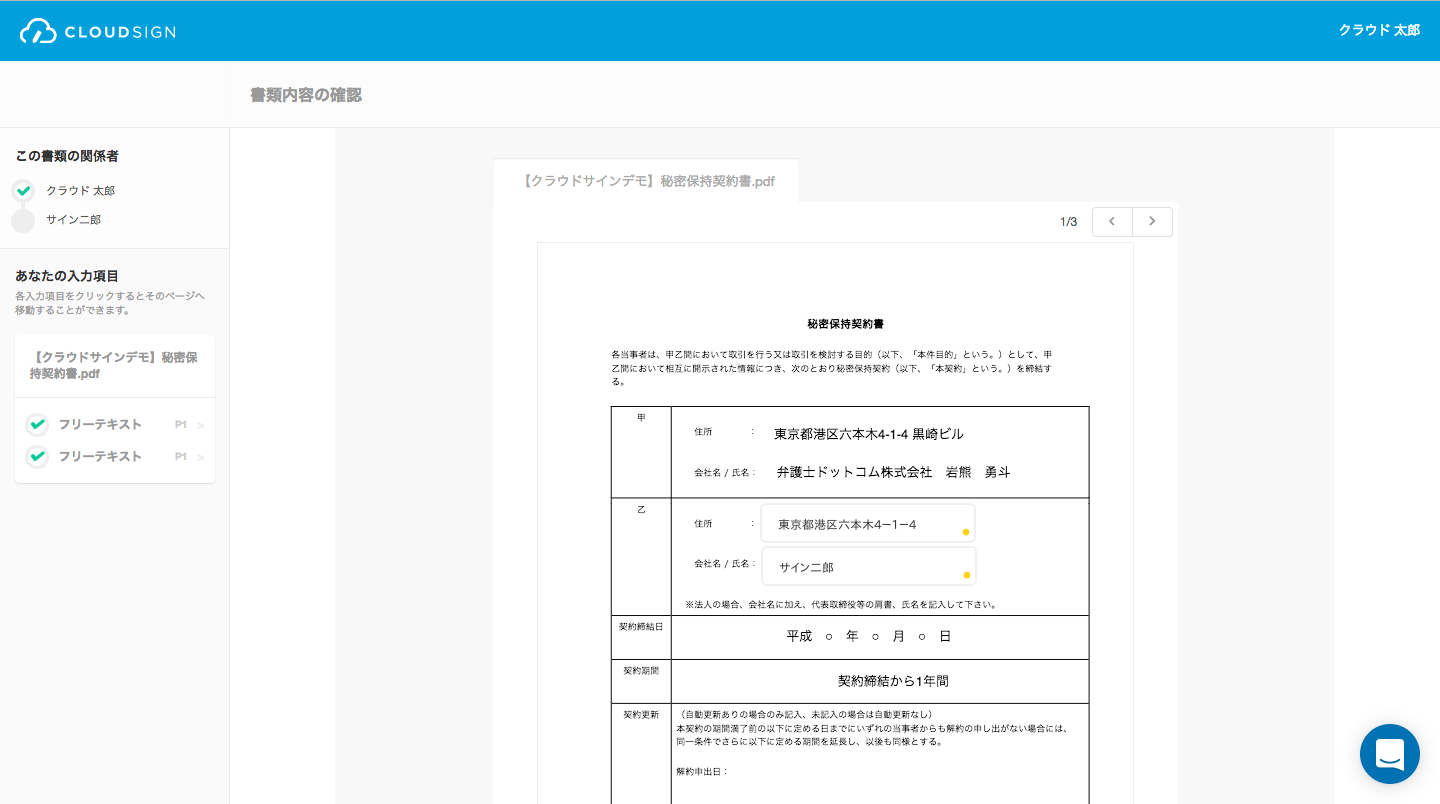
3. A form is automatically created after the “CSV template” has been uploaded, so you can check the recipients and input fields.
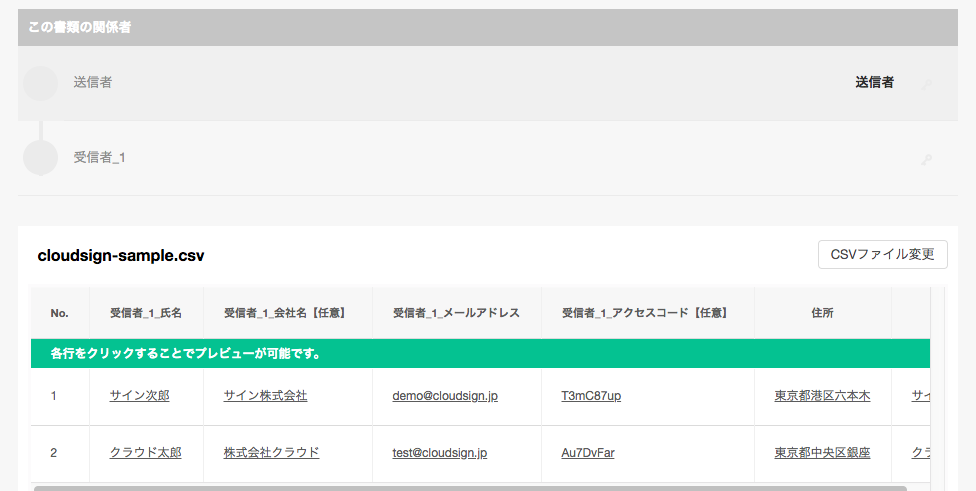
[How to check each documents]
Clicking each document allows the content of each completed document to be checked.
Q1. I want to check the status of the documents sent by bulk sending
-
Sent documents can be checked in the “History” tab of “Manage bulk sendings” in the management menu,
-
All sent documents are stored individually under “Being verified by recipient.”
Q2. I want to send a bulk reminder for all unconcluded documents
-
You can send a bulk reminder from the “History” tab of “Manage bulk sendings.” Please check here for details.
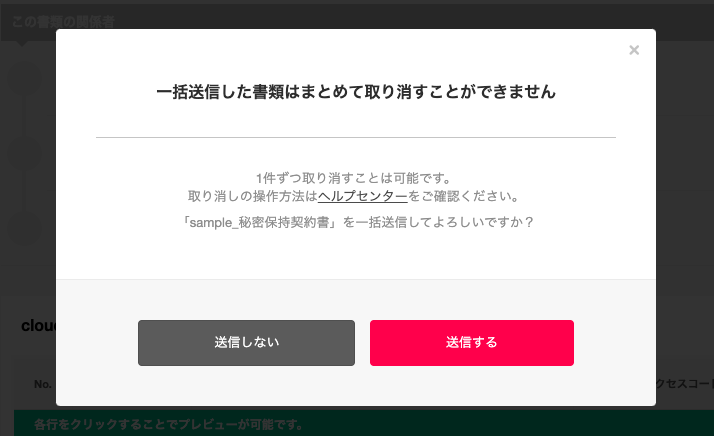
Q3. I want to cancel all unconcluded documents at once
-
Documents sent as a bulk sending can be canceled individually. Please kindly note that documents cannot be canceled in bulk currently.
-
If you wish to cancel the documents, click the relevant document in “Being verified by recipient” folder, or in the “History” tab in “Manage batch sendings (β version),” under the management menu.
Click “Cancel document” at the top right.